PerFORMing the Push Up – 6/15/2019
The Push up as an Assessment Tool
The ratio of one’s strength to one’s body weight can be a useful indicator of physical health. The push up is one tool to measure or assess that ratio. The raising and lowering of the whole body uses muscles of the neck, shoulders, arms, hands, torso and abdomen and to a lesser degree the legs and feet.
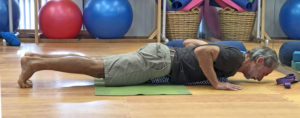
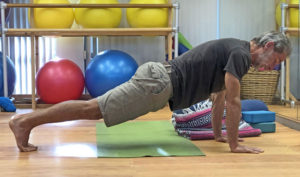
History of Push ups
A quick internet search turns up Jerick Revilla as the originator of the modern push up. That was 1905. To be fair, the Roman Emperor Constantine, who ruled 306 to 337 A.D., is said to have done a very similar exercise. And 1,000 years ago, Hindu warriors were said to include this movement as part of their war preparedness routine.
Strength to Body Weight
You probably won’t be waging war on the sub-continent or marching off with the Roman legions to expand the empire, but good strength to body weight is useful any time. So, let’s have a look at the basic push up from the Restorative Exercise/Nutritious Movement (NM) perspective. The question is not only can you perform the move(s), but how are you per-FORM-ing it? Are there muscles that you are over using? Are there other muscles that are under per-FORM-ing? How can you scale or modify the exercise to fit your current strength and coordination? And how and when do you progress as your strength and coordination improve?
Form and the Push Up
There are a lot of strong, fit, shoe-wearing people on the web demonstrating how to do push ups. What I found interesting from the NM perspective was a) no mention of hand “form” other than wrist below elbow and b) if the shoulder blades (scapulae) were mentioned, they were supposed to be wide apart (protracted to neutral) in the up, elbows extended position, and close together (retracted) in the down, elbows flexed position.
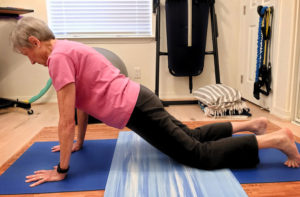
Start the Push Up in a Quadruped
I consider the fingers, hands, wrists, elbows and scapulae to be the “canaries in the coal mine” of form for the push up. So, let’s start in a position of lower load: the Quadruped.
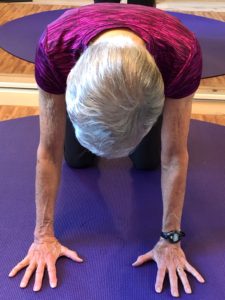
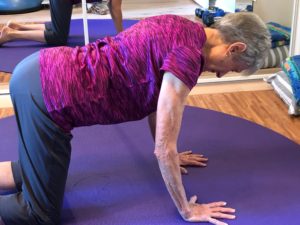
Put an equal load on fingers, hands and wrists, not just the wrists. And point the middle fingers straight ahead. Hang the head and get the shoulders out of the ears (depress your scapulae down toward your hips). Maintain the spinal curves and a neutral pelvis. With elbows slightly bent, can you externally rotate your arm bones making your elbow “pits” face more forward than toward one another? This may be difficult.
Mindful Movement
Now, retract and protract your shoulder blades. What happened to all these “alignment markers”? Held in place or blown out? This is mindful movement, allowing a thorough assessment of strength, range of motion and motor skill(s). Weakness and areas of instability are revealed, often in muscles that we have been unaware of or neglected. This awareness increases the effectiveness of your training.
Pelvis and Elbows and Shoulders and Wrists – Oh My!
When you’ve “mastered” all this, it’s time to raise the bar. From the quadruped position, with scapulae protracted to neutral and all the other markers in place as best you can, bend your elbows – WITHOUT MOVING YOUR PELVIS BACKWARD! Which direction do your elbows go? What happened to your shoulder blades? Were they stable or did they collapse together? Did you stick your chin out and up, extending your neck? Are your shoulders up in your ears, blocking your ability to hear? Is all the weight only in your wrists, with some fingers bending, twisting or lifting?
Move Your DNA
None of this is “wrong,” and it is very informative. If this is the only position that you can do this move in, you are missing the loading of some of your “parts”. You get selectively strong/ stable/skilled when working in less than a full range because some muscles get overworked, some underworked. For a greater, more technical explanation of all this, take a look at Move Your DNA by Katy Bowman.
Breath as an Alignment Point
In NM, breath is considered an alignment point. Yes, more to monitor! It is VERY important that you inhale and exhale while doing these moves. If you can only do this while holding your breath, you’ve started at too difficult a level. Please back off. Use your ability to breathe as an indicator that you are working safely. This assures gradual and lasting change.
Progressing the Push Up
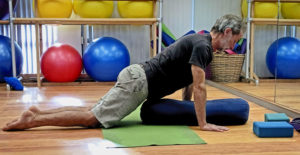
As I’ve mastered these skills, I’ve moved on to push ups first with the knees down, then knees up, on my toes. I am always looking to improve my form and getting more of my “parts” involved.
By: Tim Harris, Master Level RES Instructor and Guest Author
Tim teaches classes at the BEACH (Body Education Alignment Center for Health) owned by RES Breena Maggio. Breena provides on-line classes for a minimal fee as well as live classes at the studio. And you can sign up for the newsletter by clicking here. Tim has recently recorded a series of three push-up classses that are available as part of a monthly membership for on-line classes or as a stand alone package. You will find these invaluable to get your push up “off the ground” (couldn’t resist!). Click here for more information.
While you’re at the BEACH, check out Joan’s Core series.

Yahoo Joan (you’re so very awesome) and good work Tim!